
Nerd Rating:
Web Apps Using NextJS, AWS Amplify, Tailwind & Font Awesome - Part 2 of 4 - Cloud Infrastructure

Part 1 - Application Basics
Part 2 - Cloud Infrastructure - This post
Part 3 - Adding Icons
Part 4 - Using Font Awesome Pro with AWS Amplify
Part 2 of 4 - Cloud Infrastructure
Second in a four-part series where I show you how to set up a web application using Nextjs, AWS Amplify and Font Awesome. Note: this post series covers installation and setup of the various components, but does not go into detail on how to create your application once it's set up.
What we'll cover:
- Creating your backend in Amplify Studio
- Creating data tables in DynamoDB
- Setting up user authentication
- Connecting your frontend to your backend
- Accessing your content from your application
What you'll need:
- A high-level data design
- A test email address
- A Google Machine for when things go very, very wrong
- Backup copies of your work (Do it! You'll thank me!)
Optional but nice to have:
- A teleporter (so you don't waste time WALKING to the coffee machine)
- A leave of absence from your day job
- A lapdog (FUZZY!)
Create your Backend
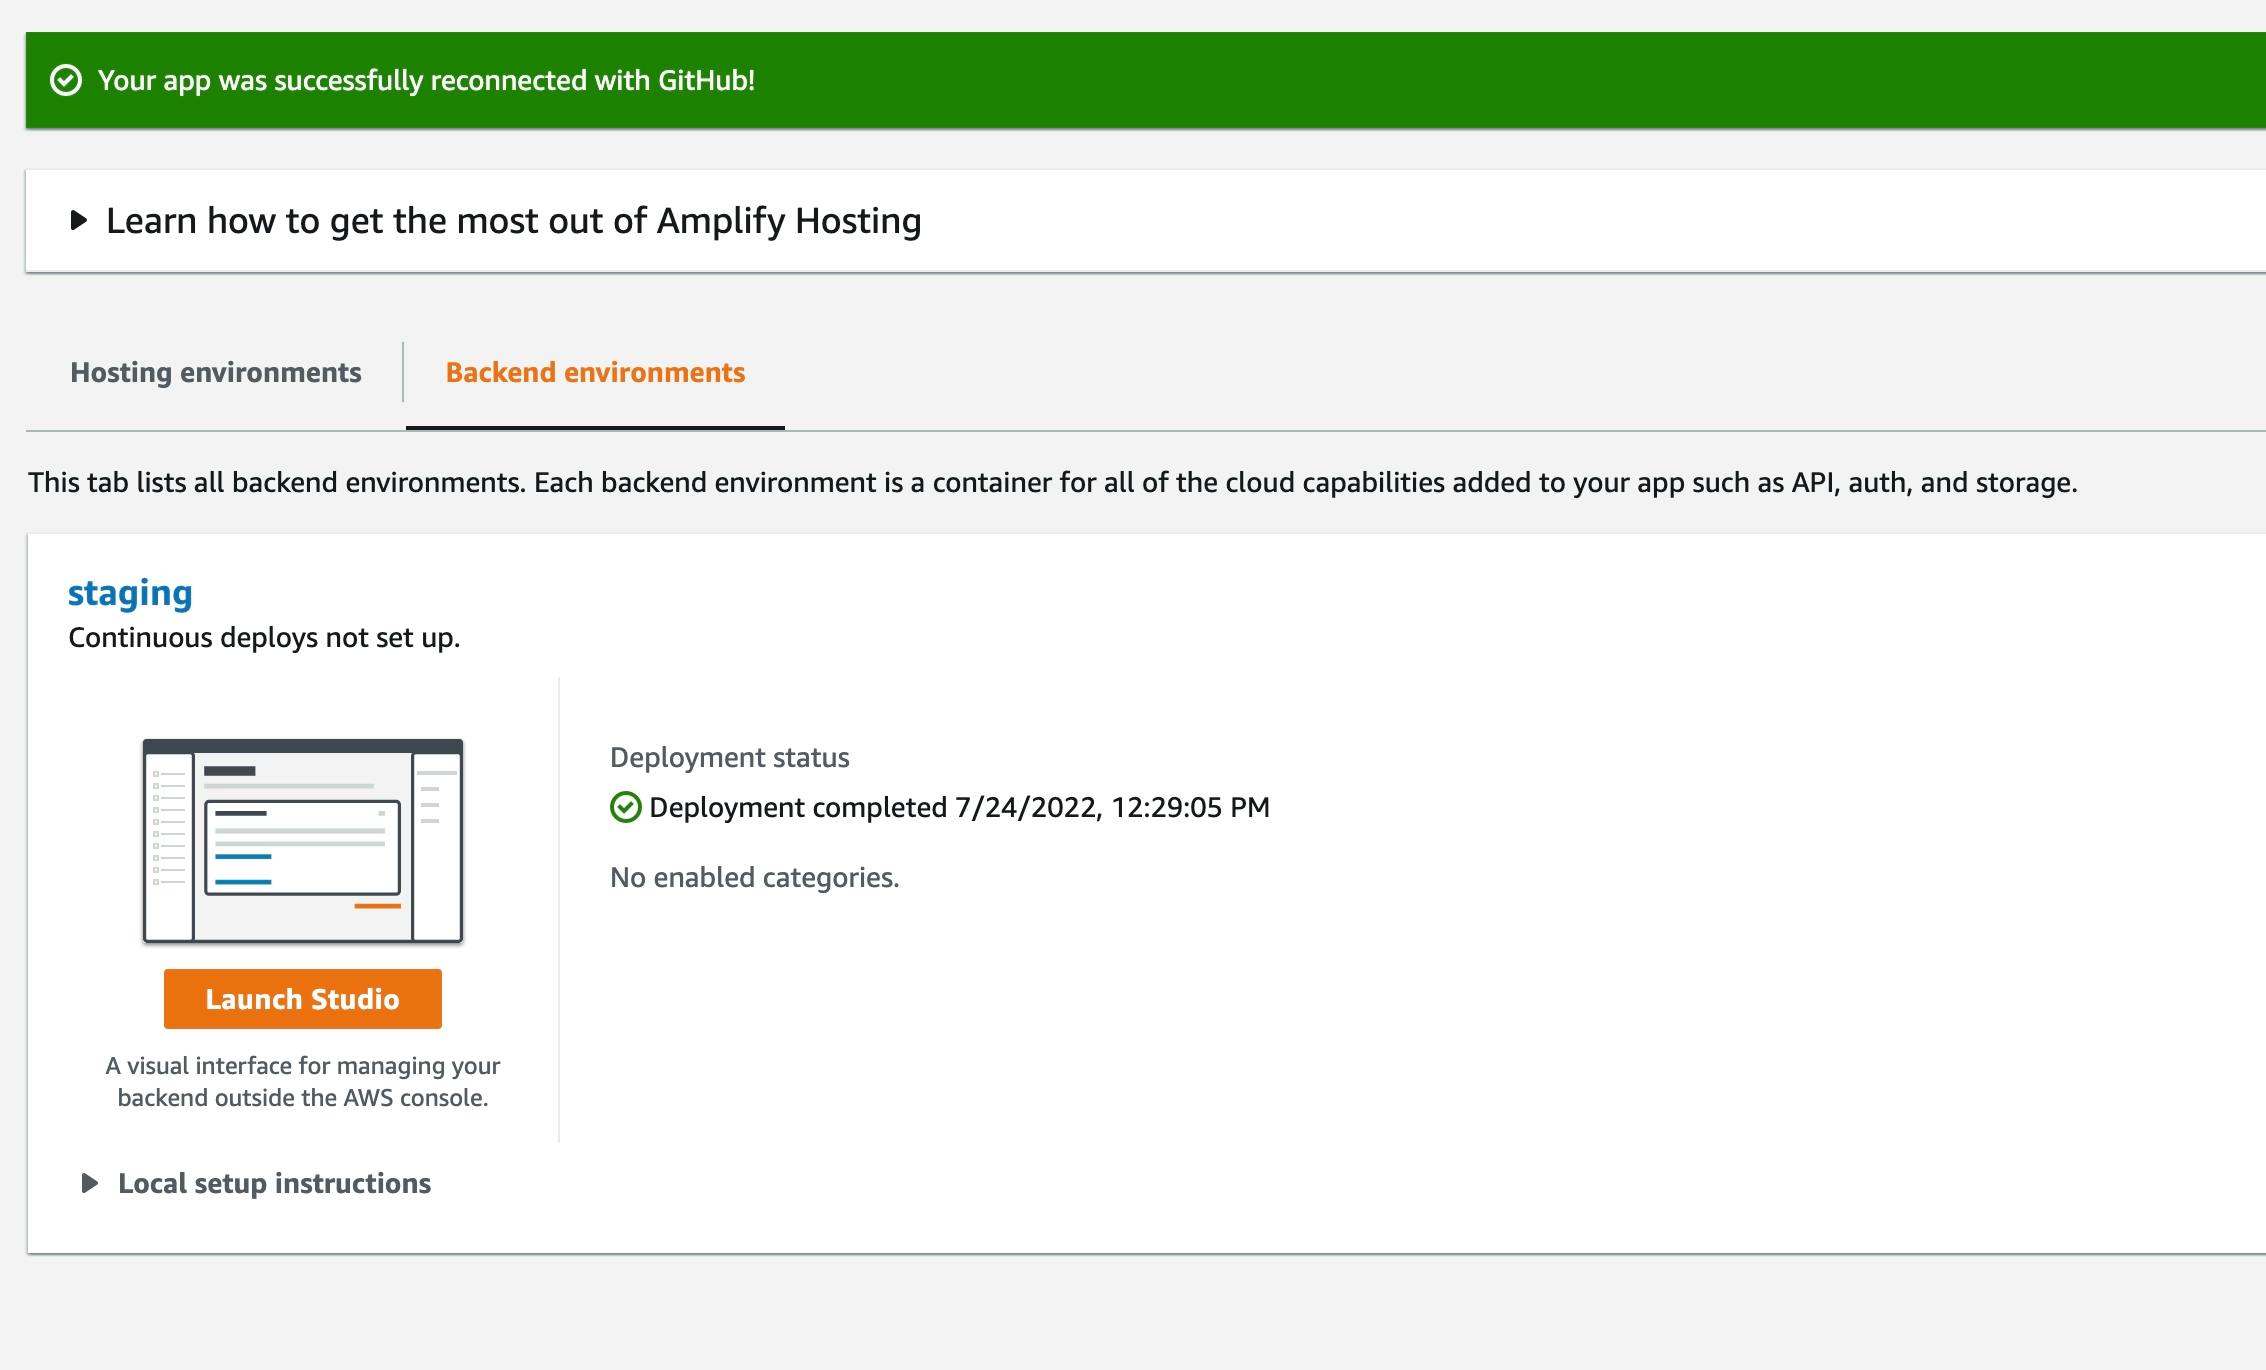
First, log in to your AWS Console and navigate to AWS Amplify. Select the application created in the previous post, select the Backend Environments tab and then select 'Get Started'. Amplify will run for awhile setting up your back end resources and then will let you know when your backend has been successfully created.
Your Backend Environments tab should now look like this:
Create Data Tables
Click the Launch Studio button and you'll be taken to the Amplify Studio home page. Click Create Data Model and you'll be taken to the visual editor. From there we'll click the Add Model button and create our first table. We'll keep it simple for this example:
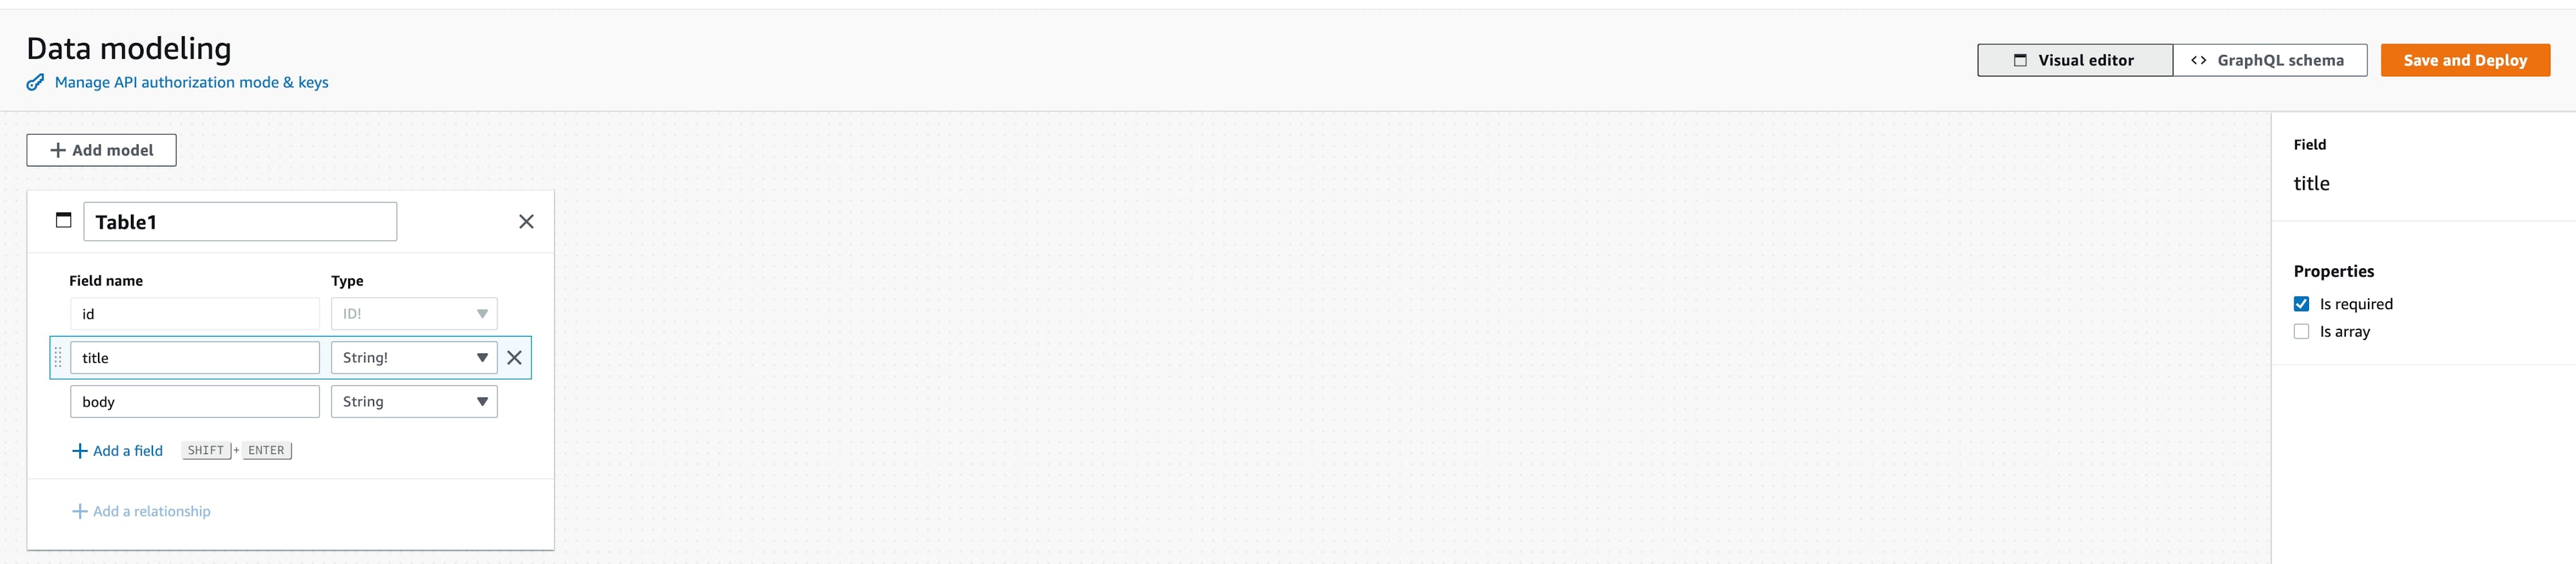
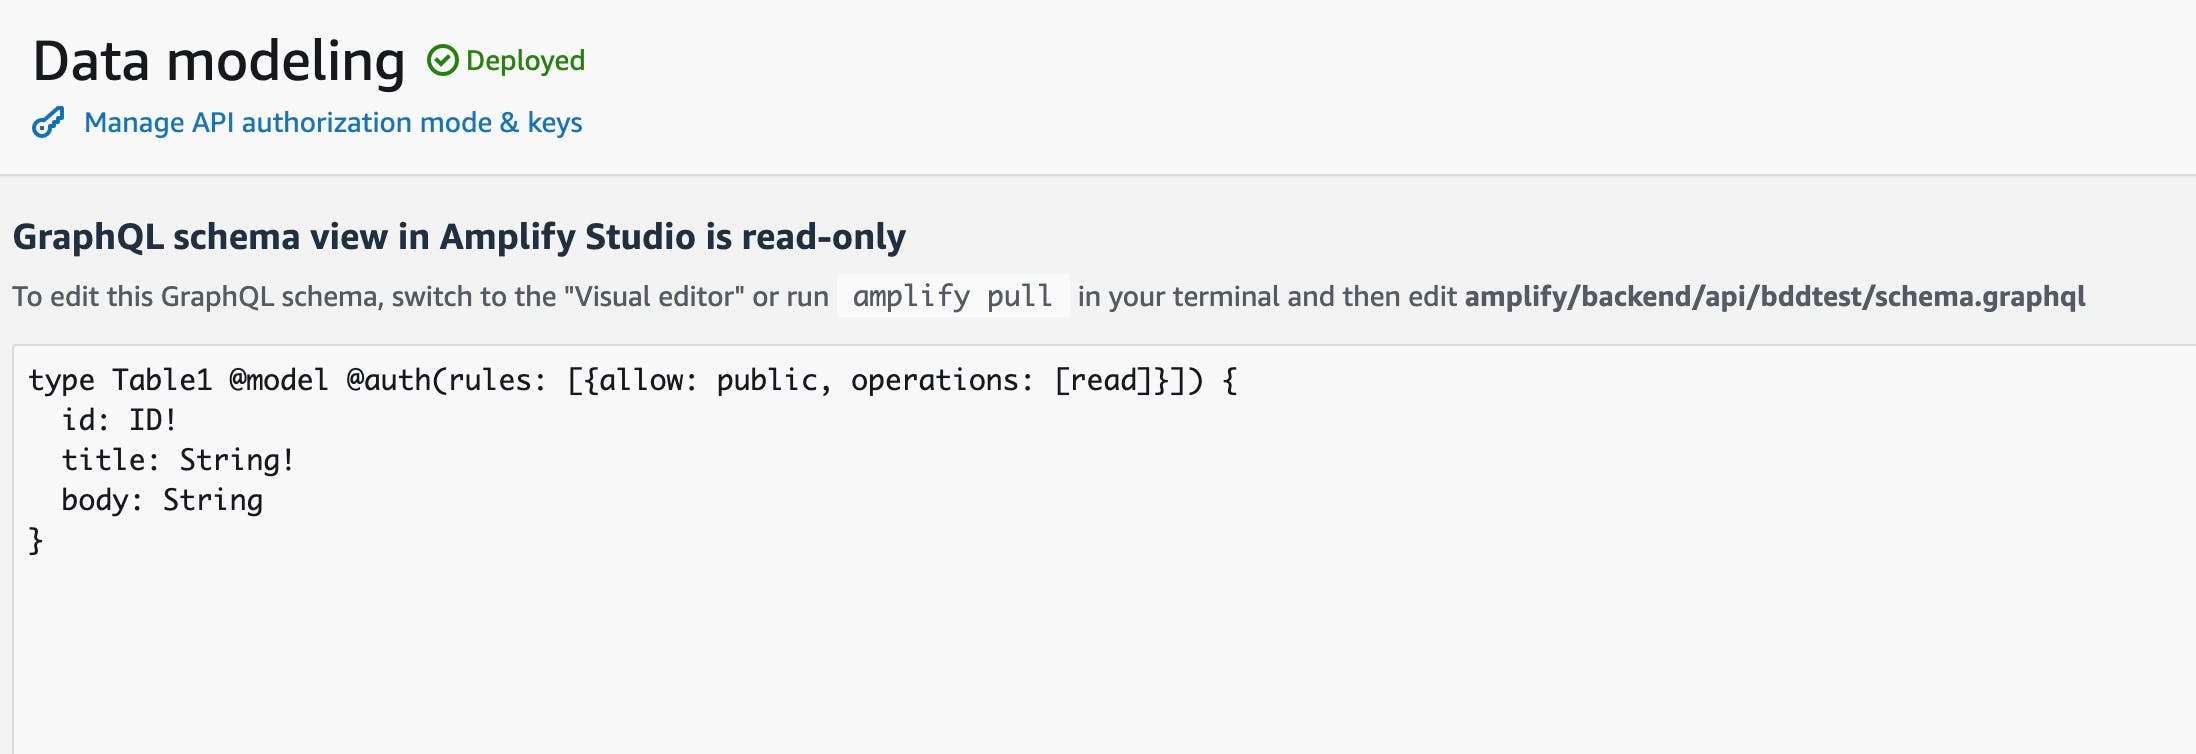
To make a field required, check the required box on the right side. Once you have added your fields. Click the button titled 'GraphQL Schema' and you'll see the the GraphQL schema that has been generated:
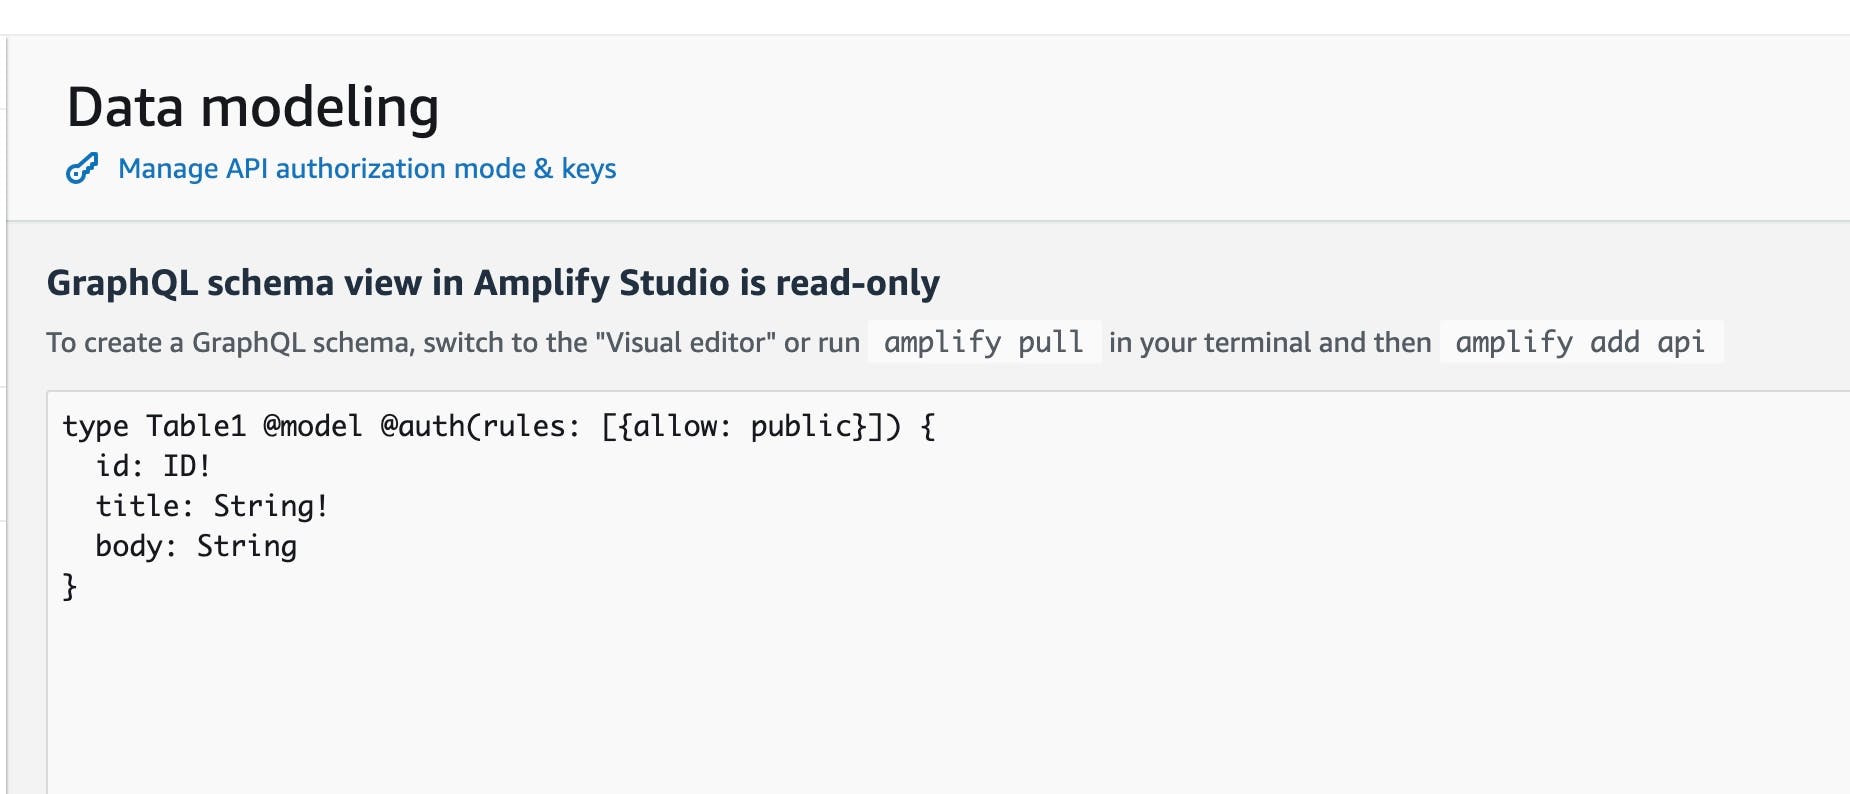
The GraphQL schema is read only in Amplify Studio, but once we connect our Frontend to our Backend, we'll be able to update the data models via this GraphQL schema from our project. Click the Save and Deploy button to create your DynamoDB tables. This will take several minutes.
Once your data model has been deployed you now have an operational DynamoDB table to work with in your project. To add records to the table from Amplify Studio, select Content from the side menu, choose the table you just created from the dropdown and click the Create yourTable button.
Add a few test records and then come back here when you're ready.
Set Up User Authentication
So now your table is created but the default access is to allow anyone with the API key to have full access to the records. We'll change that by setting up User Authentication. Once we have authentication enabled, we'll be able to restrict access to the tables to authorized users.
Click Authentication on the side menu, and you'll be taken to the Authentication section where you'll be able to configure new authentication modes for your app, or reuse existing authentication resources. For now we will skip this and allow Read-Only access using an API Key.
Click Data on the side menu to return to your Visual Editor. Click on your table name field and you should see 'Authorization Rules' in the box on the right. Click the dropdown on the existing Authorization rule and you should see four check boxes.
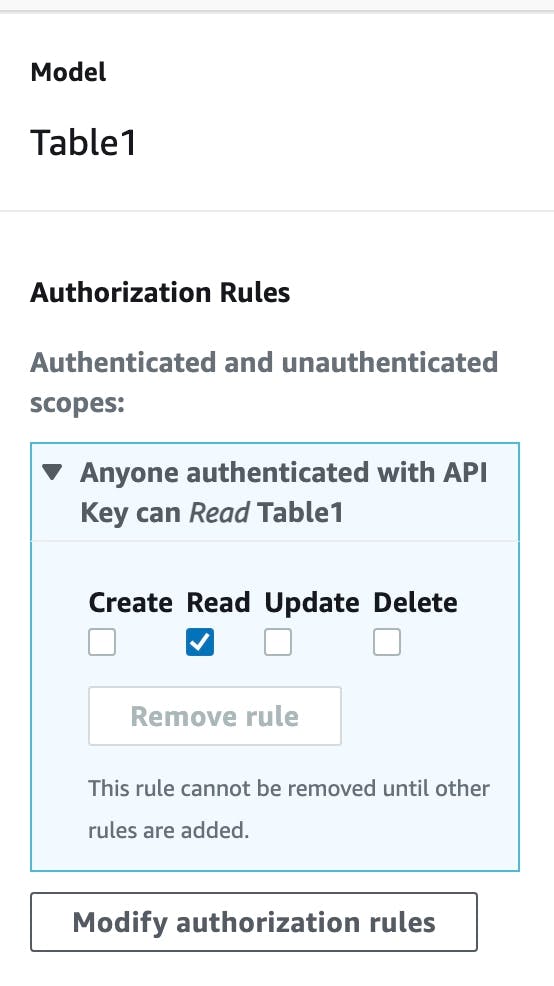
Uncheck all but the read checkbox. Click Save and Deploy and once Amplify Studio is finished process, your table will be restricted to Read-Only access.
Additionally, if you select the GraphQL tab you can see how the rule has been implemented in the schema.
Connecting Your Frontend to your Backend
Now for the moment you've all been waiting for. Let's connect the Frontend to the Backend and get everyone playing nicely together.
Head back to your terminal and navigate to the root of your project. We will need to install the Amplify CLI to continue. The Amplify CLI allowed for much more control over your application than what is allowed in Amplify Studio so we will be doing most of our Amplify interaction from here from now on. Install the CLI using the following:
curl -sL https://aws-amplify.github.io/amplify-cli/install | bash && $SHELL
One that completes, pop over to Amplify Studio and look to the top right part of the screen. You should see a link that says either, 'Deployment successful - click for next steps' or 'Local setup instructions'. Click the link and copy the command:
amplify pull --appId YOURAPPID --envName staging
What this will do is install the necessary files for your Backend environment and allow your Frontend to talk to you back end. Head back to your terminal window and paste or type the previous command and hit enter. You'll be taken to an Amplify Studio window in your browser which will ensure that you want to log in to the Amplify CLI. Click 'Yes' and then head back to your terminal window. Follow the prompts to choose your editor (vs-code), language (javascript), framework (react), src and distribution directory paths as well as your build and start commands. The defaults should all be fine.
The Amplify CLI will process and then will ask if you plan to update the backend. Type 'y', hit enter and then Amplify will pull the backend environment from the cloud. To update the Backend in the future, should you change anything via Amplify Studio, you can use the following command:
amplify pull
Now, if you go to your code editor and look at your project files you will see that you now have an amplify folder. If you navigate to amplify/backend/api you will find a file called schema.graphql which should contain the same schema code you saw on Amplify Studio. This will tell your project what your data looks like.
schema.graphql
type Table1 @model @auth(rules: [{allow: public, operations: [read]}]) {
  id: ID!
  title: String!
  body: String
}
Should you update your data models on Amplify studio and run 'amplify pull' you will see the updates in this file. Alternatively, you can make updates to this schema file and run 'amplify push' to push the changes to your backend. This is how you will have to add more complex model configurations such as secondary indices, etc. We won't cover that here but you can find more info in the resources below.
Accessing Your Content From Your App
Now that your Frontend is connected to your backend, we'll need to tell Amplify to allow you to access the content you created. To do this, head back to your terminal where we'll set up the GraphQL API access. In your terminal, enter the following:
amplify update api
You'll then choose GraphQL, Authorization Modes, API Key. You'll be prompted to enter a description for your API key and set how many days before it will expire. Select 'n' to not configure any additional Auth types and hit enter. Now if you go into your project files you will see an aws-exports.js file which will contain info about your GraphQL API endpoint and your API key.
Next we'll add Amplify Auth to our project so that we will be authorized to pull generated GraphQL resources into our project. In your terminal window type:
amplify auth add
Choose the default configuration, choose how you want your users to sign in (I chose email to make it simple) and then skip advanced configuration by selecting 'No, I am done.' Once that completes, we will push this new auth configuration to Amplify:
amplify push
Select 'y' to continue and your resources will be built in the cloud (this will take a few minutes).
The last thing we'll need to do in order to be able to access your content is to use Amplify CodeGen to generate the code files you'll need to access your GraphQL data. To do this, enter the following in your terminal window:
amplify codegen add
Select language target (javascript), and accept the default for the file name pattern, and then type 'y to generate your GraphQL resources. Again accept the defaults, and let Amplify do its thing. Once it has finished, you will now find a graphql folder under the src folder in your project. This contains the queries, mutations, and subscriptions available for the data tables you created.
Finally, install aws-amplify, which will provide the code resources your project will need to access your Backend:
npm install aws-amplify
Congratulations, you are now ready to access your content. Head back to your code editor and replace the contents of _app.js with the following:
_app.js
import { Amplify } from "aws-amplify"
import config from '../src/aws-exports'
import '../styles/globals.css'

Amplify.configure({
  ...config, ssr: true
});


function MyApp({ Component, pageProps }) {
  return <Component {...pageProps} />
}

export default MyApp
In index.js add the following import statements to the top:
import { API } from "@aws-amplify/api";
import { listYourTableNames } from '../src/graphql/queries'
Create the following async function somewhere within your index.js file:
  async function fetchData() {
    const dataRecords = await API.graphql({
      query: listYourTableNamess
    });

    console.log("data: ", dataRecords)
  }
And then call the function within your Home function:
export default function Home() {
  fetchData()
  return (...
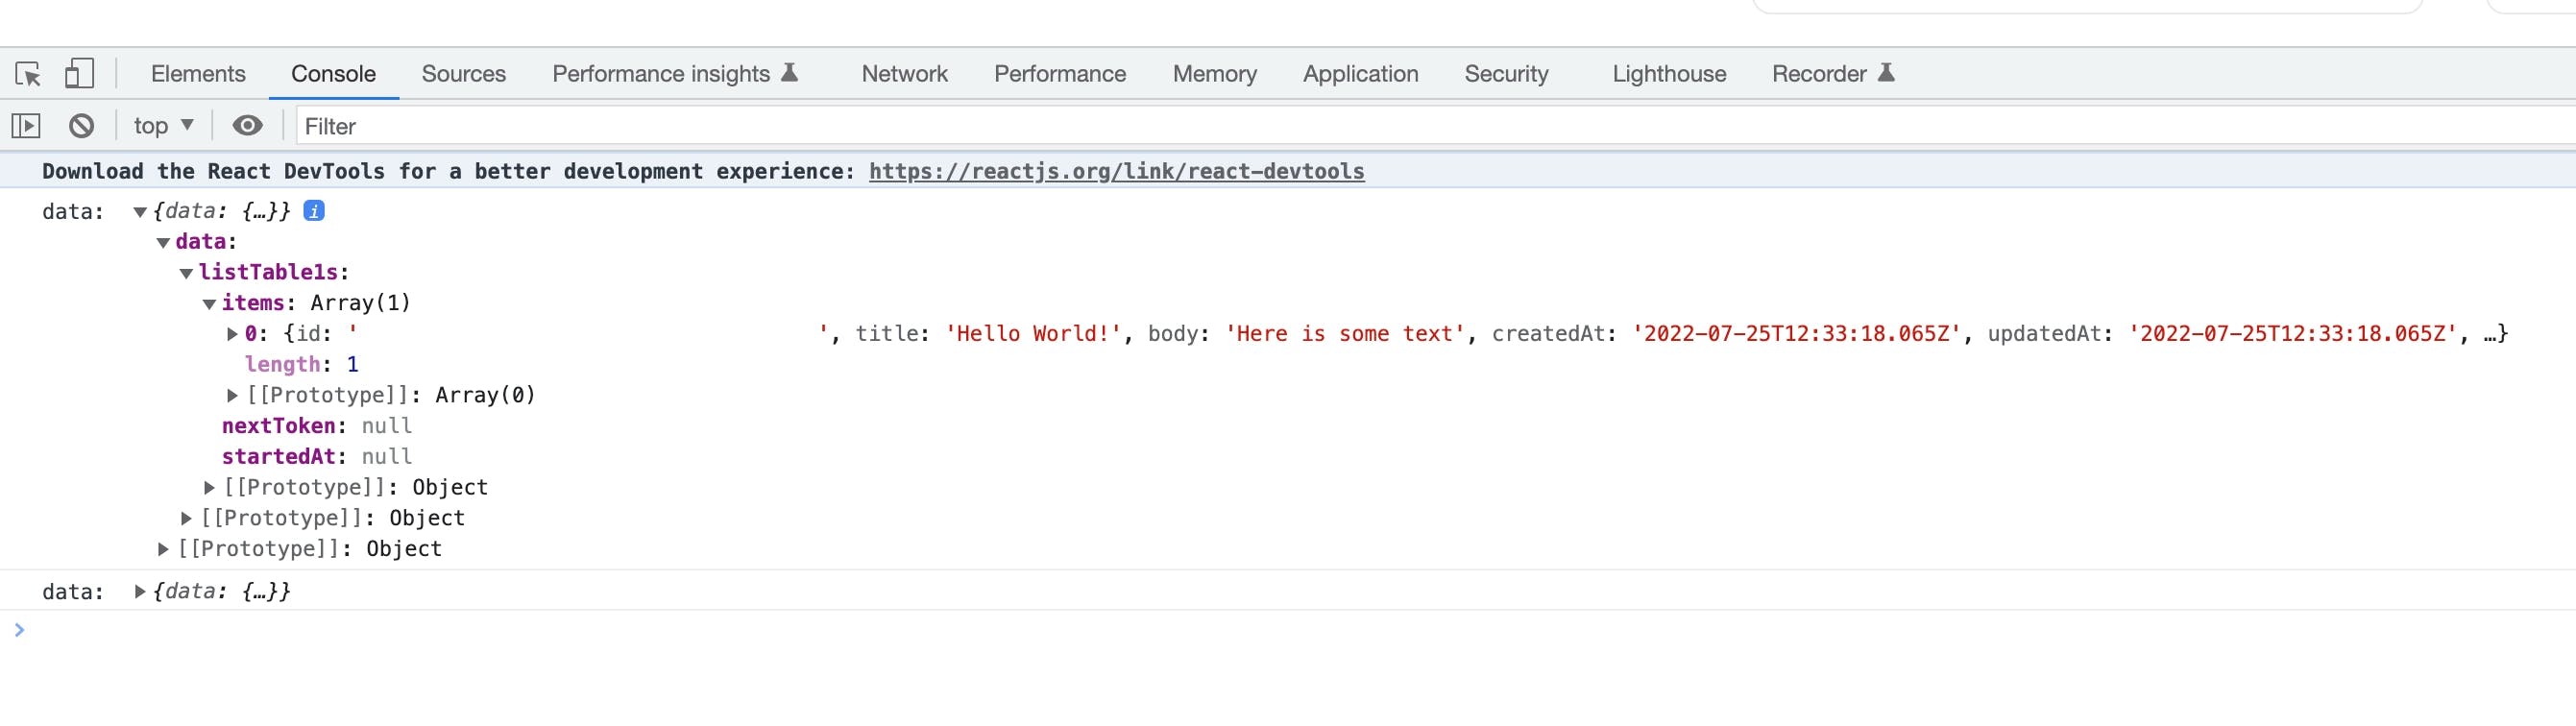
Start up your dev server and then run your app and you should see the output in the console.log:
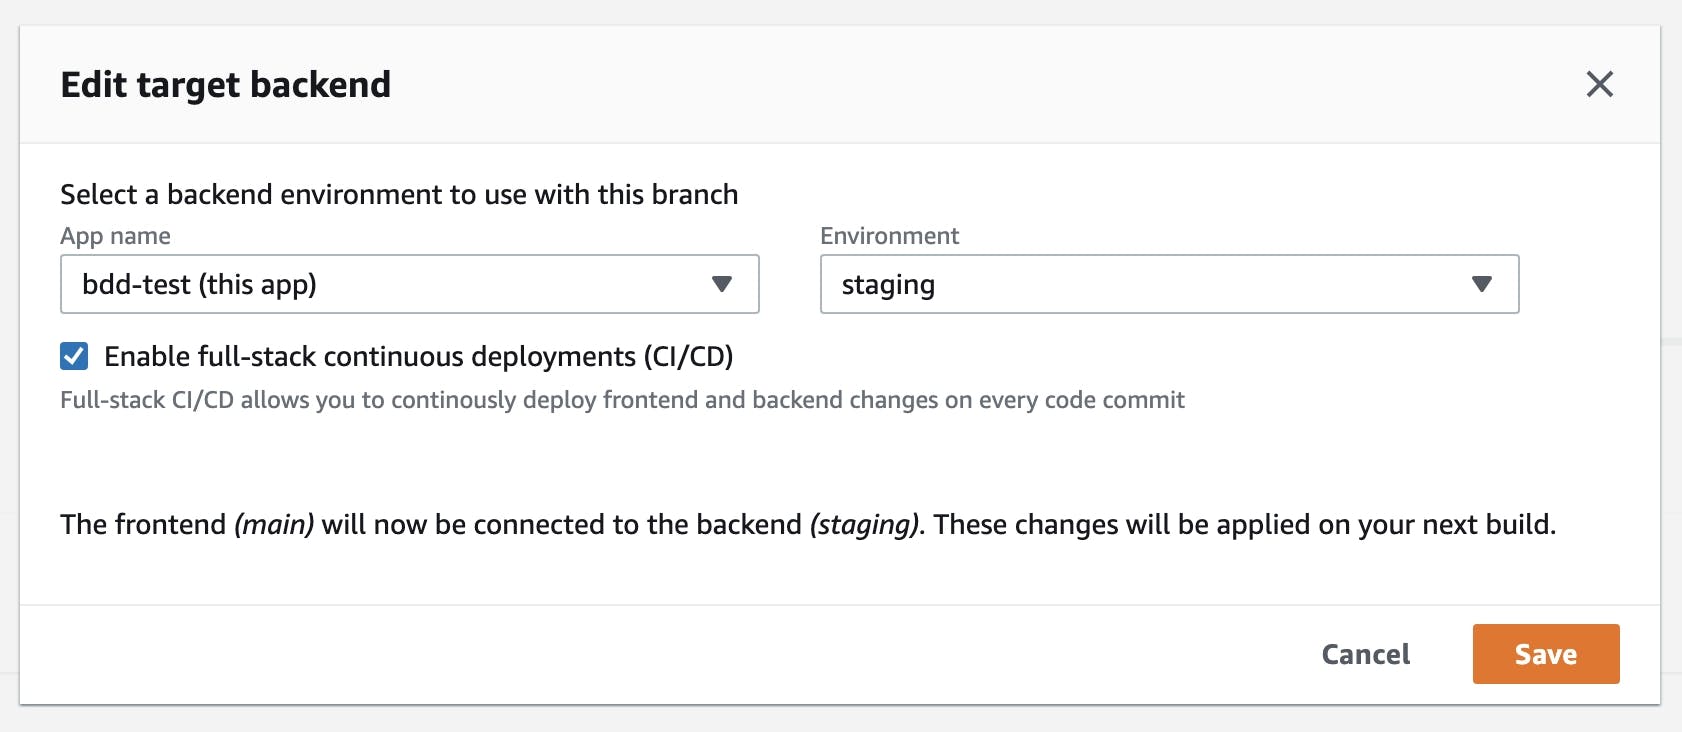
The last thing do to is to edit your Amplify app to add the Backend to your build settings. Go to Amplify, select your app, go to the Hosting Environments tab and next to 'Continuous Deploys set up...' click '(Edit)'. From there you will be able to select your Backend environment will then be added to your continuous deployments work flow.
And now you have successfully, created your Backend, added some data, connected your Frontend and accessed your data. Commit your changes in your code editor, sync your changes with your remote repository and then go your app on Amplify to see your application automatically being rebuilt in the cloud.
Whew! That was a long one, but you made it! In my next post we will cover adding icons to your application using Font Awesome. See you there!
Resources
- Newer Posts
- Page 8 of 9
- Older Posts